The Windows 11 24H2 update is here, and with it comes a slew of new features and improvements. However, in true Microsoft fashion, the update also brings back some features users might not find particularly useful or appealing. One such addition is the “Learn About This Picture” icon, which appears on the desktop as part of Windows Spotlight. If you’ve been trying to remove this icon without success, don’t worry—we’ve got you covered. In this guide, we’ll walk you through the steps to permanently remove the “Learn About This Picture” icon from your Windows 11 desktop.
What is the “Learn About This Picture” Icon?
The “Learn About This Picture” icon is part of the Windows Spotlight feature, which automatically sets beautiful images as your desktop wallpaper. Along with these wallpapers, the icon provides more information about the current picture, such as its origin, photographer, and other details. While this feature can be informative, many users find the persistent desktop icon distracting or unnecessary.
Unfortunately, Microsoft has not included a straightforward way to remove the icon from the desktop. There’s no toggle in the settings menu, and you can’t delete the icon by simply right-clicking it. Instead, you’ll need to use the Registry Editor to make some changes. Let’s dive into the process.
ALSO READ – Facebook Privacy Alert: How to Check and End Active Sessions on Facebook, A Complete Guide
Step-by-Step Guide to Remove the “Learn About This Picture” Icon
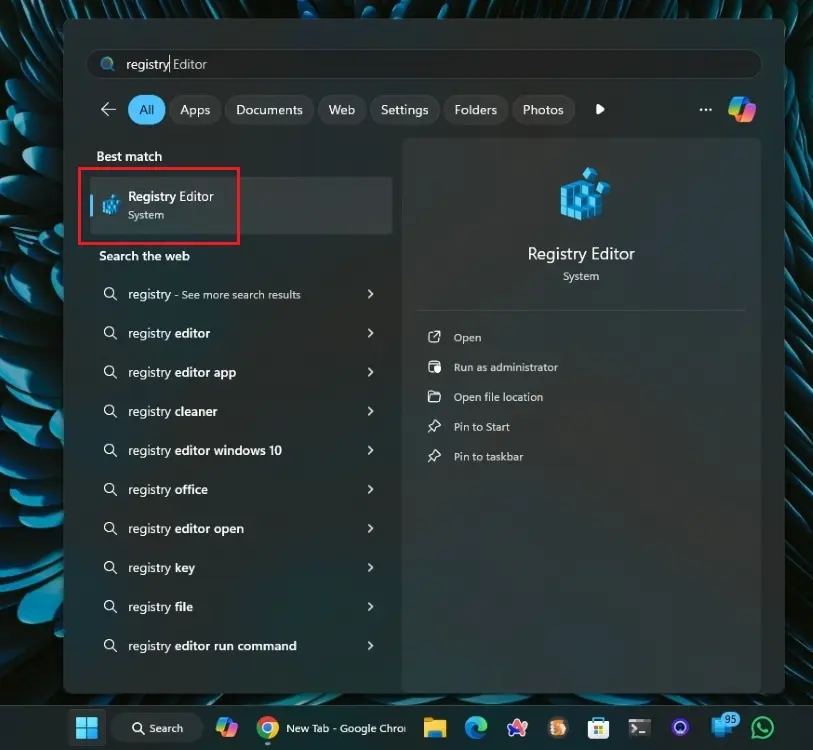
Step 1: Open the Registry Editor
The Registry Editor is a powerful tool that allows you to modify system settings. Follow these steps to open it:
- Press the Windows key on your keyboard.
- Type Registry into the search bar and select Registry Editor from the search results.
- If prompted by User Account Control (UAC), click Yes to grant permission.
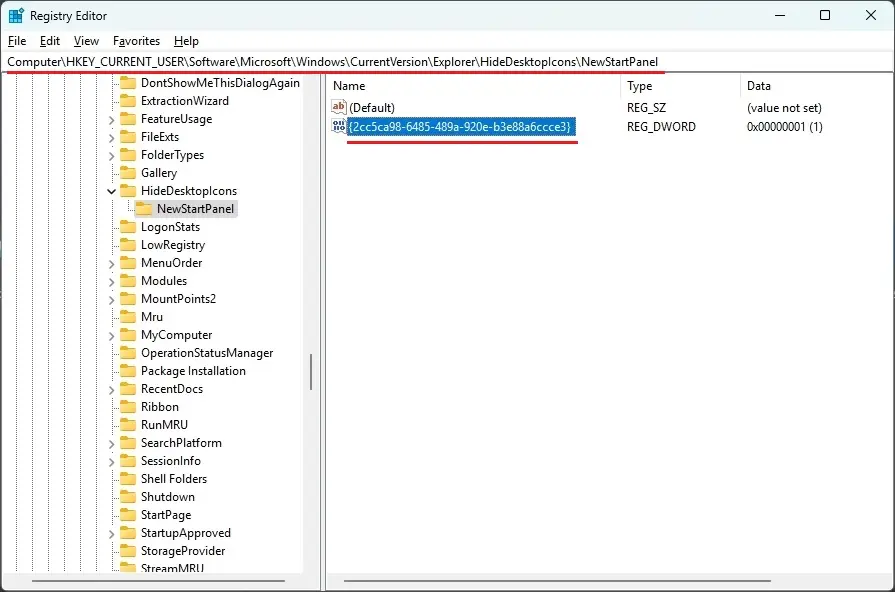
Step 2: Navigate to the Correct Registry Path
Once the Registry Editor is open, you need to locate the specific registry key responsible for the “Learn About This Picture” icon. Here’s how:
- Copy the following path:
Computer\HKEY_CURRENT_USER\Software\Microsoft\Windows\CurrentVersion\Explorer\HideDesktopIcons\NewStartPanel- Paste the path into the Registry Editor’s address bar at the top and press Enter.
Step 3: Modify the Registry Value
In the “NewStartPanel” registry key, you’ll find a list of entries. Locate the following entry:
{2cc5ca98-6485-489a-920e-b3e88a6ccce3}- Double-click on this entry to open it.
- In the Value data field, change the value to
0. - Click OK to save your changes.
Step 4: Refresh the Desktop
To apply the changes, you need to refresh your desktop:
- Right-click anywhere on the desktop.
- Select Refresh from the context menu.
The “Learn About This Picture” icon should now be gone from your desktop.
Alternative Method: Change Your Wallpaper
If you’re not comfortable using the Registry Editor, there’s an easier (albeit less permanent) way to remove the “Learn About This Picture” icon. You can simply change your desktop wallpaper to one from your own collection. Here’s how:
- Right-click on an empty space on your desktop and select Personalize.
- In the Personalization settings, click on Background.
- Under the “Choose your picture” section, select an image from your computer or click Browse to upload a new one.
- Once you set a custom wallpaper, the “Learn About This Picture” icon will no longer appear.
Keep in mind that this method disables the Windows Spotlight feature entirely, so you won’t receive new wallpapers from Microsoft.
ALSO READ – 10 Best OpenLoad Movies Alternatives
Why Use the Registry Editor?
While changing your wallpaper is a quick fix, using the Registry Editor provides a more permanent solution. By modifying the registry, you ensure that the “Learn About This Picture” icon won’t reappear even if you re-enable Windows Spotlight in the future.
However, it’s important to exercise caution when using the Registry Editor. Making incorrect changes can lead to system issues. Always back up your registry before making modifications. To back up the registry:
- In the Registry Editor, click on File and select Export.
- Choose a location to save the backup file and give it a descriptive name.
- Click Save to create the backup.
If something goes wrong, you can restore the registry by double-clicking the backup file and following the prompts.
Additional Tips for Customizing Windows 11
If you’re interested in further customizing your Windows 11 experience, here are some tips:
1. Explore New Themes
Windows 11 offers a variety of themes to personalize your desktop. To access them:
- Go to Settings > Personalization > Themes.
- Browse through the available options or download additional themes from the Microsoft Store.
2. Enable Dark Mode
Dark mode is not only easier on the eyes but also gives your desktop a sleek, modern look. To enable it:
- Open Settings and go to Personalization > Colors.
- Under “Choose your mode,” select Dark.
3. Use Widgets
Windows 11 introduces a customizable widgets panel that provides quick access to news, weather, and more. To open it, click on the Widgets icon in the taskbar or press Win + W.
Conclusion
The “Learn About This Picture” icon in Windows 11 may be a small feature, but it’s one that many users find unnecessary. Thankfully, with the help of the Registry Editor, you can easily remove this icon and enjoy a clutter-free desktop. Alternatively, you can change your wallpaper to achieve the same result without diving into the registry.
If you found this guide helpful, don’t forget to share it with others. For more tips and tricks on customizing Windows 11, check out our other articles. Have any questions or need further assistance? Drop a comment below, and we’ll be happy to help!